13 Dec Land FX Training – Send planting schedule from Land F/X to PlantMaster
Send Your Plant Schedule to PlantMaster
IMPORTANT! BEFORE YOU SEND YOUR PLANTS, MAKE SURE TO REVIEW THE TWO OPTIONS:
1. EXPORT TO CSV:
Use this option when you are working with a project that includes plants that you found outside of PlantMaster, basically any existing projects.
The spelling of plant names varies WIDELY from system to system. For the tools to work together, the plant names will need to be spelled the same. Don’t worry, we have great tools that will match most of the plant names automatically. And for any plants that don’t match, there are fantastic tools to manually match these plants (we’ll explain in better detail further in the training).
The important thing to note is that using the export to CSV option means that when you bring the plants into PlantMaster, you’ll be able to use these matching tools. (PlantMaster won’t automatically create new plant records for plants that aren’t in the database, so it will be helpful to have tools to match up as many of these plants as you can.)
2. USE “Schedule Integration” FEATURE:
Use this option if ALL your plants in your schedule are sourced from the PlantMaster database (new projects where PlantMaster is your only plant source).
While this integration is a much faster and seamless way to get your plants into PlantMaster, it’s an automated script. Which means it happens behind the scenes automatically so you won’t be able to use the matching tools. Only plants that are spelled EXACTLY the same will be added to PlantMaster.
This will work flawlessly if all your plants came from PlantMaster (obviously the spelling will be the same). But, if you have a lot of plants already in your Land F/X projects and want to bring them into PlantMaster, any plants that don’t EXACTLY match plant records in PlantMaster will be skipped. For example, if your plant schedule has 50 plants, and some of the plant names are spelled differently in both systems, you may only get 24 of those plants into PlantMaster.
Next, we’ll walk you through how to use each option.
Send Plant Schedule: Export to CSV
Inside Land F/X, select a project and navigate to your “Plant Schedule” tool option.
Select “Spreadsheet” as the destination, and then select “CSV”. This will download the CSV file to your computer.
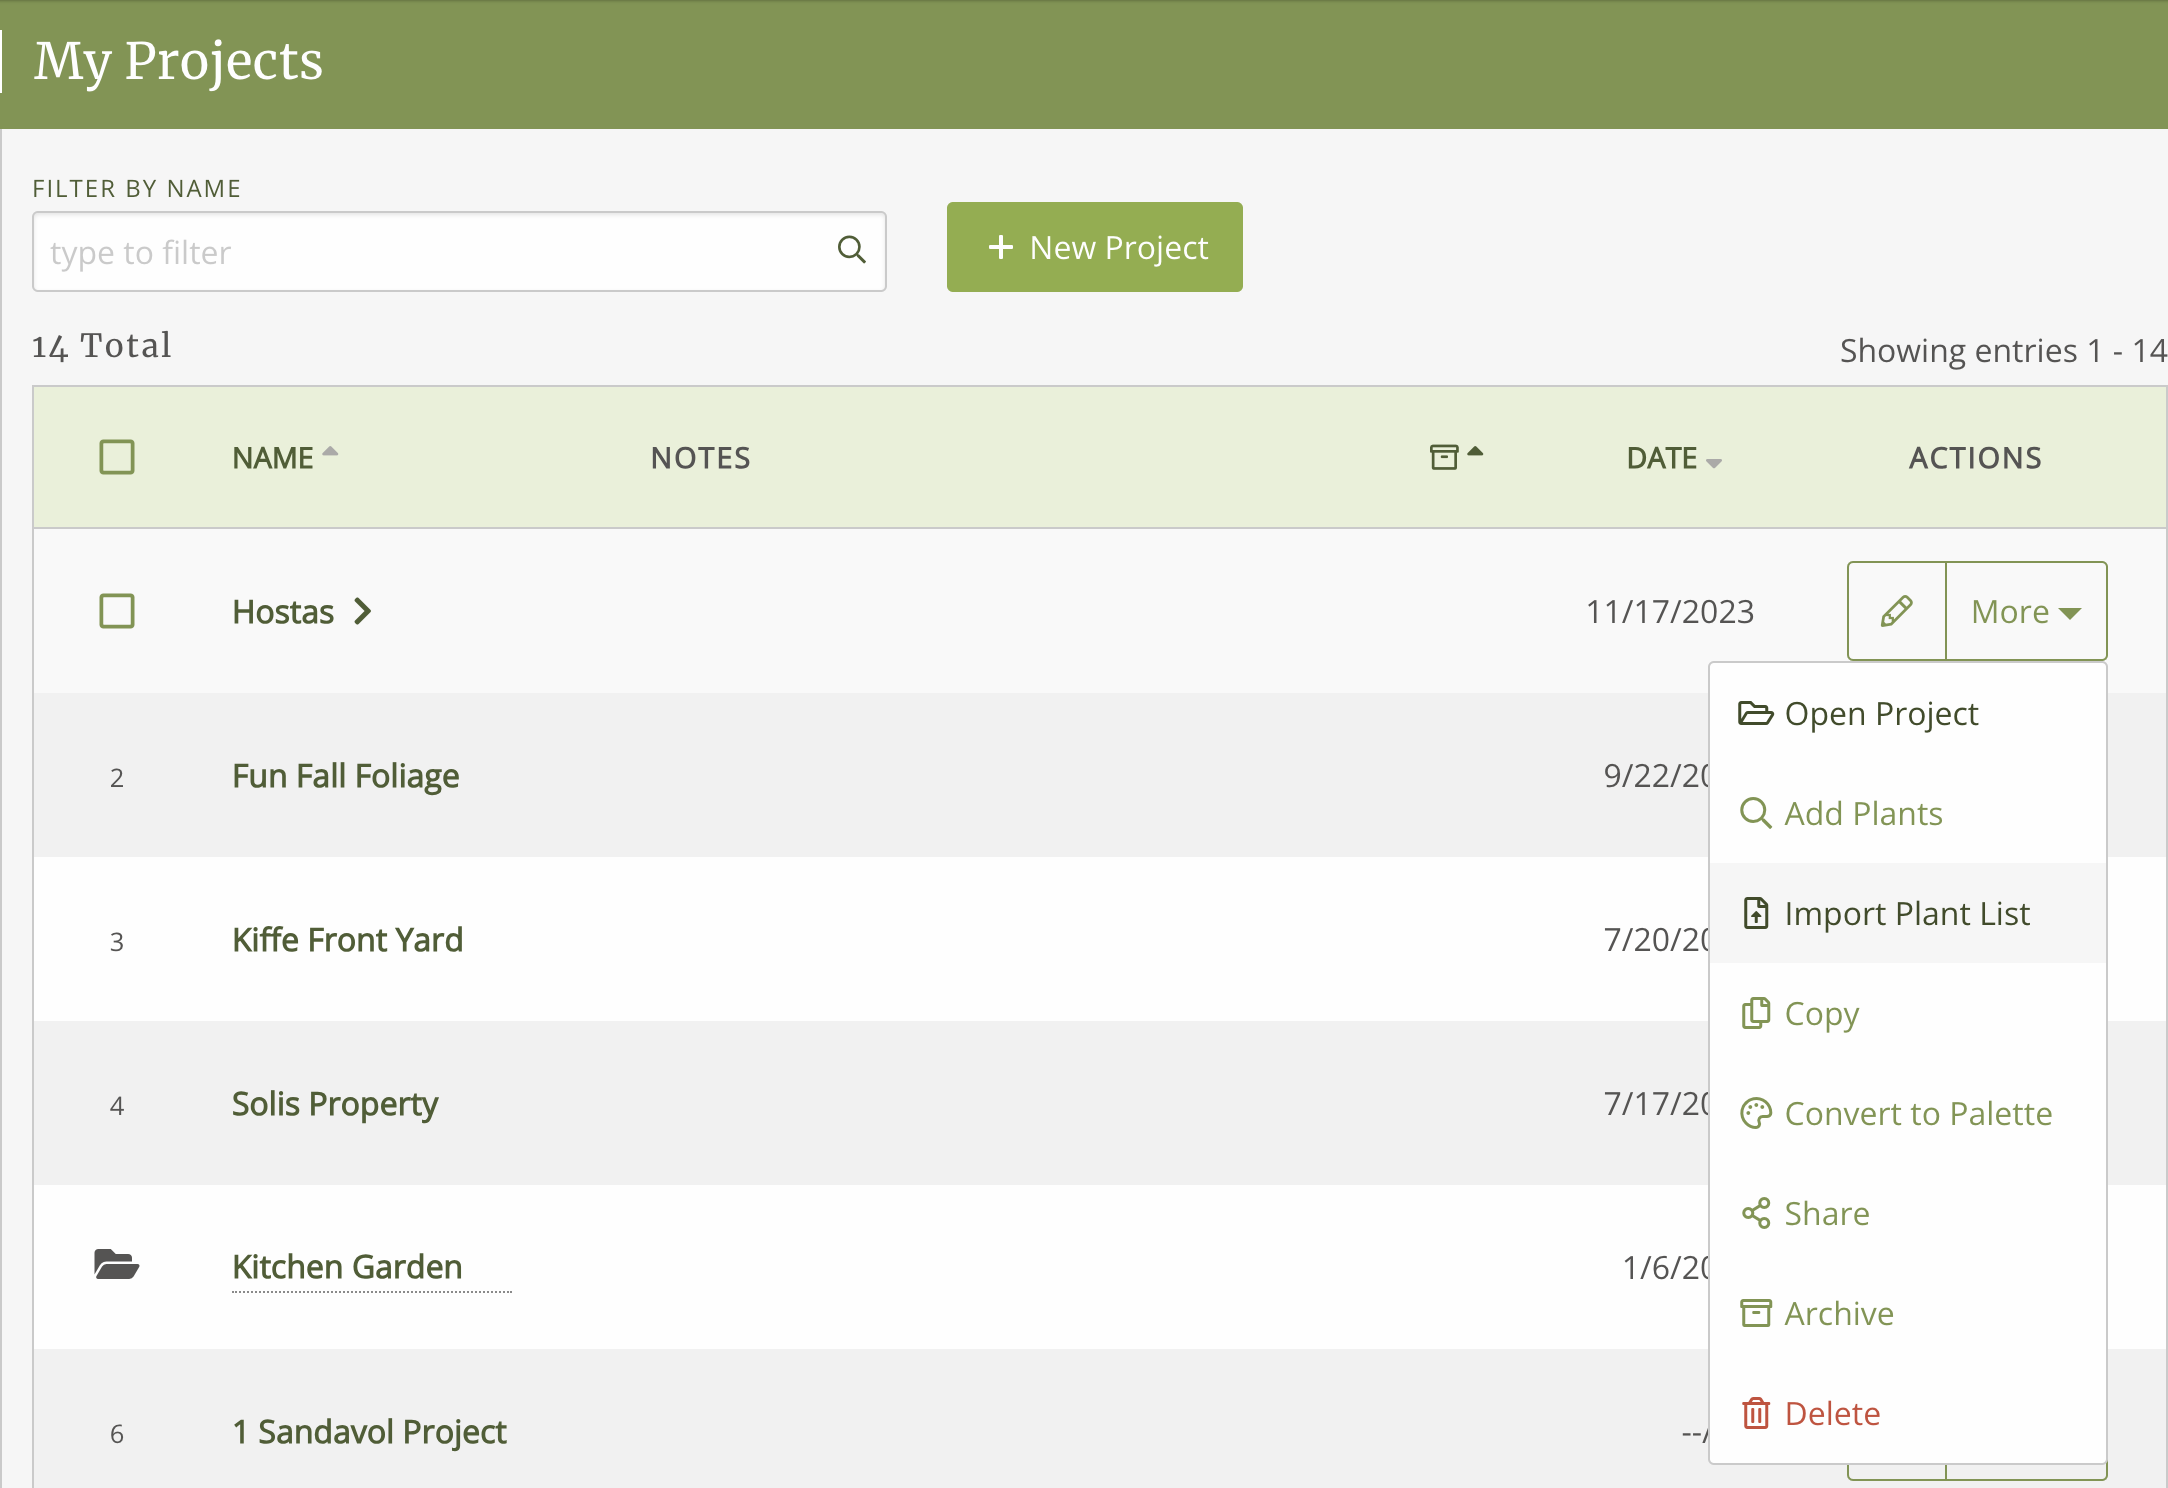
Next, log in to PlantMaster and open or start a project. Navigate to the “My Projects” page by clicking on “Manage My Projects” under “Projects” in the main menu.
This will bring you to the list of your projects. Here you can either select a project or create a new one, simply click on the project name from the list to open the project.
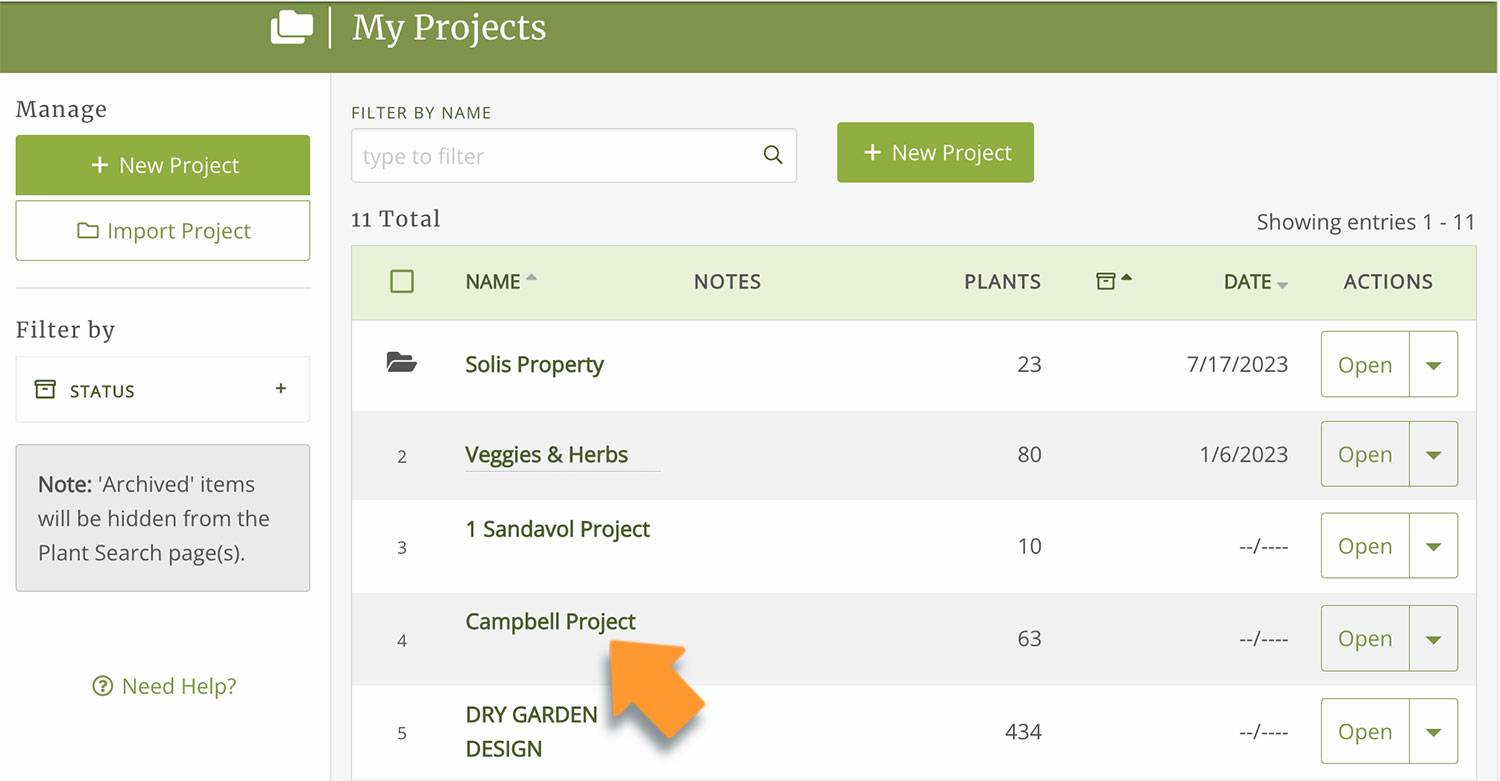
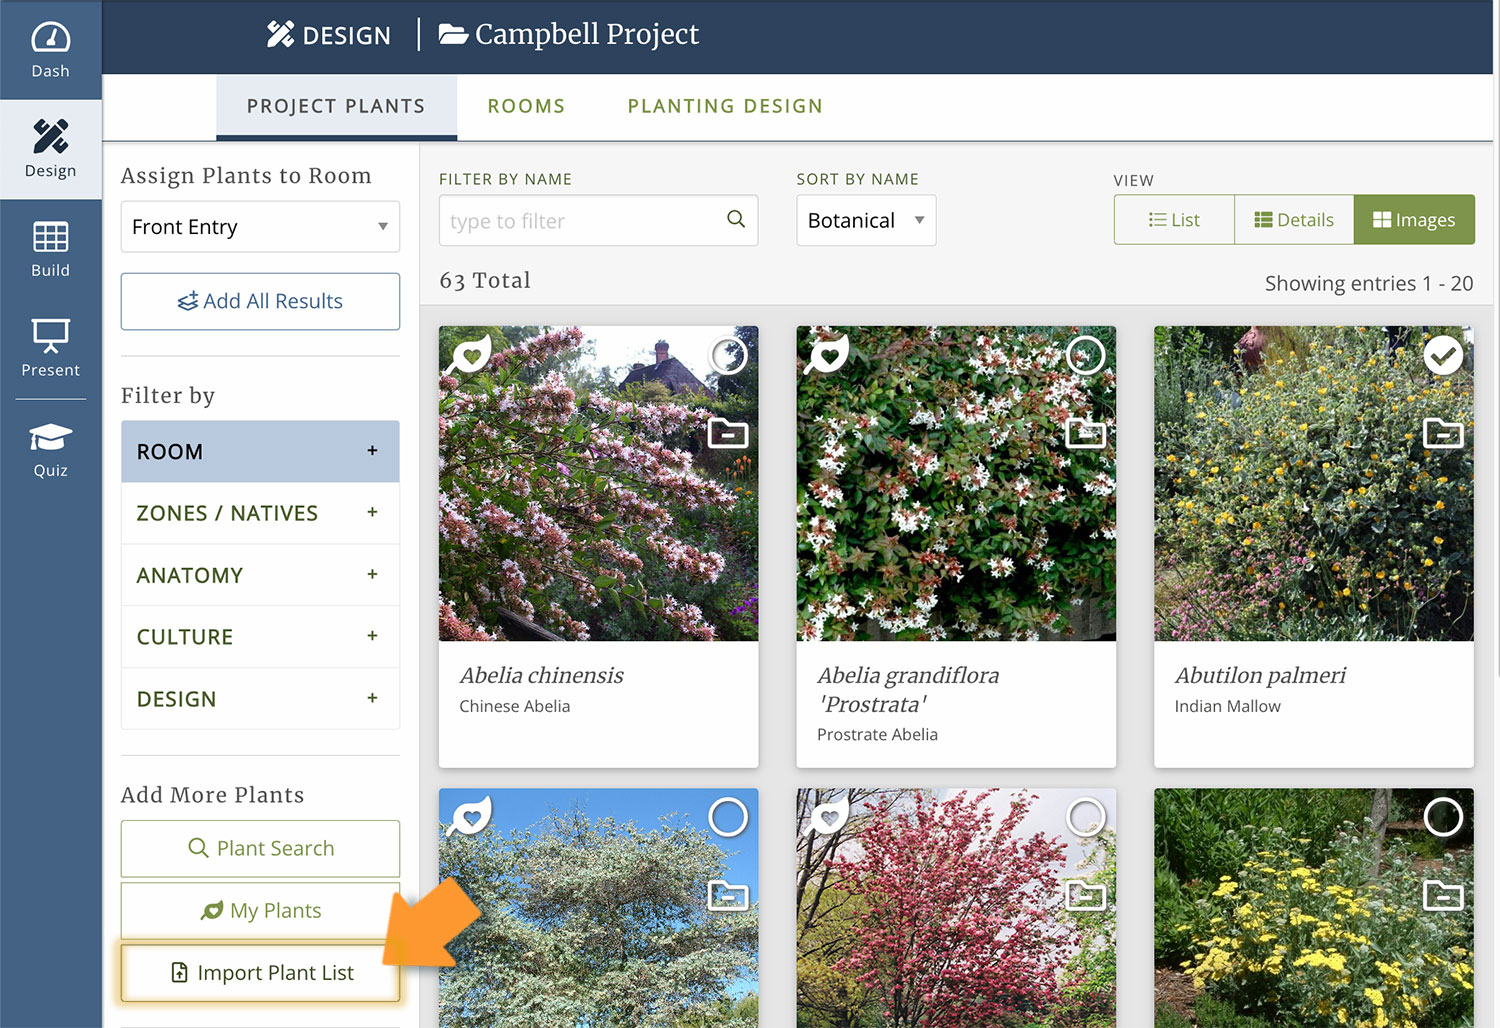
This will take you to the plants inside your project.
In the left side menu, click “Import Plant List”.
This will open the Import Plant List modal screen. It looks like this:
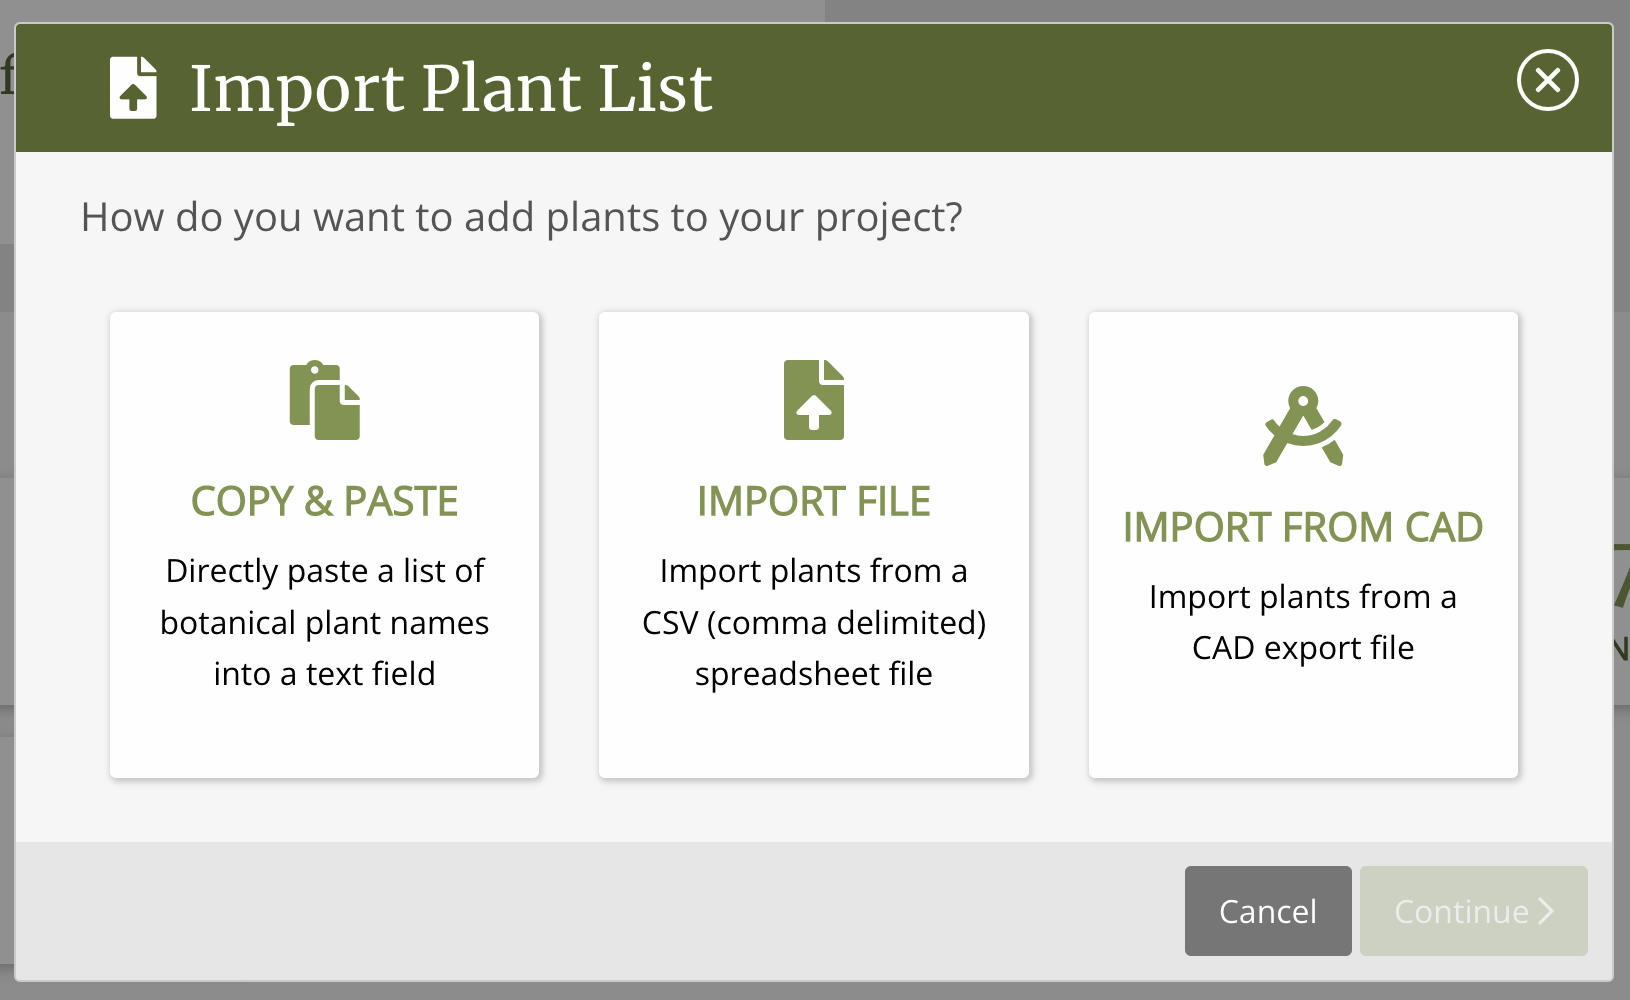
Make sure to select “Import from CSV”. (Import for CAD only works for DynaScape files, do not use)
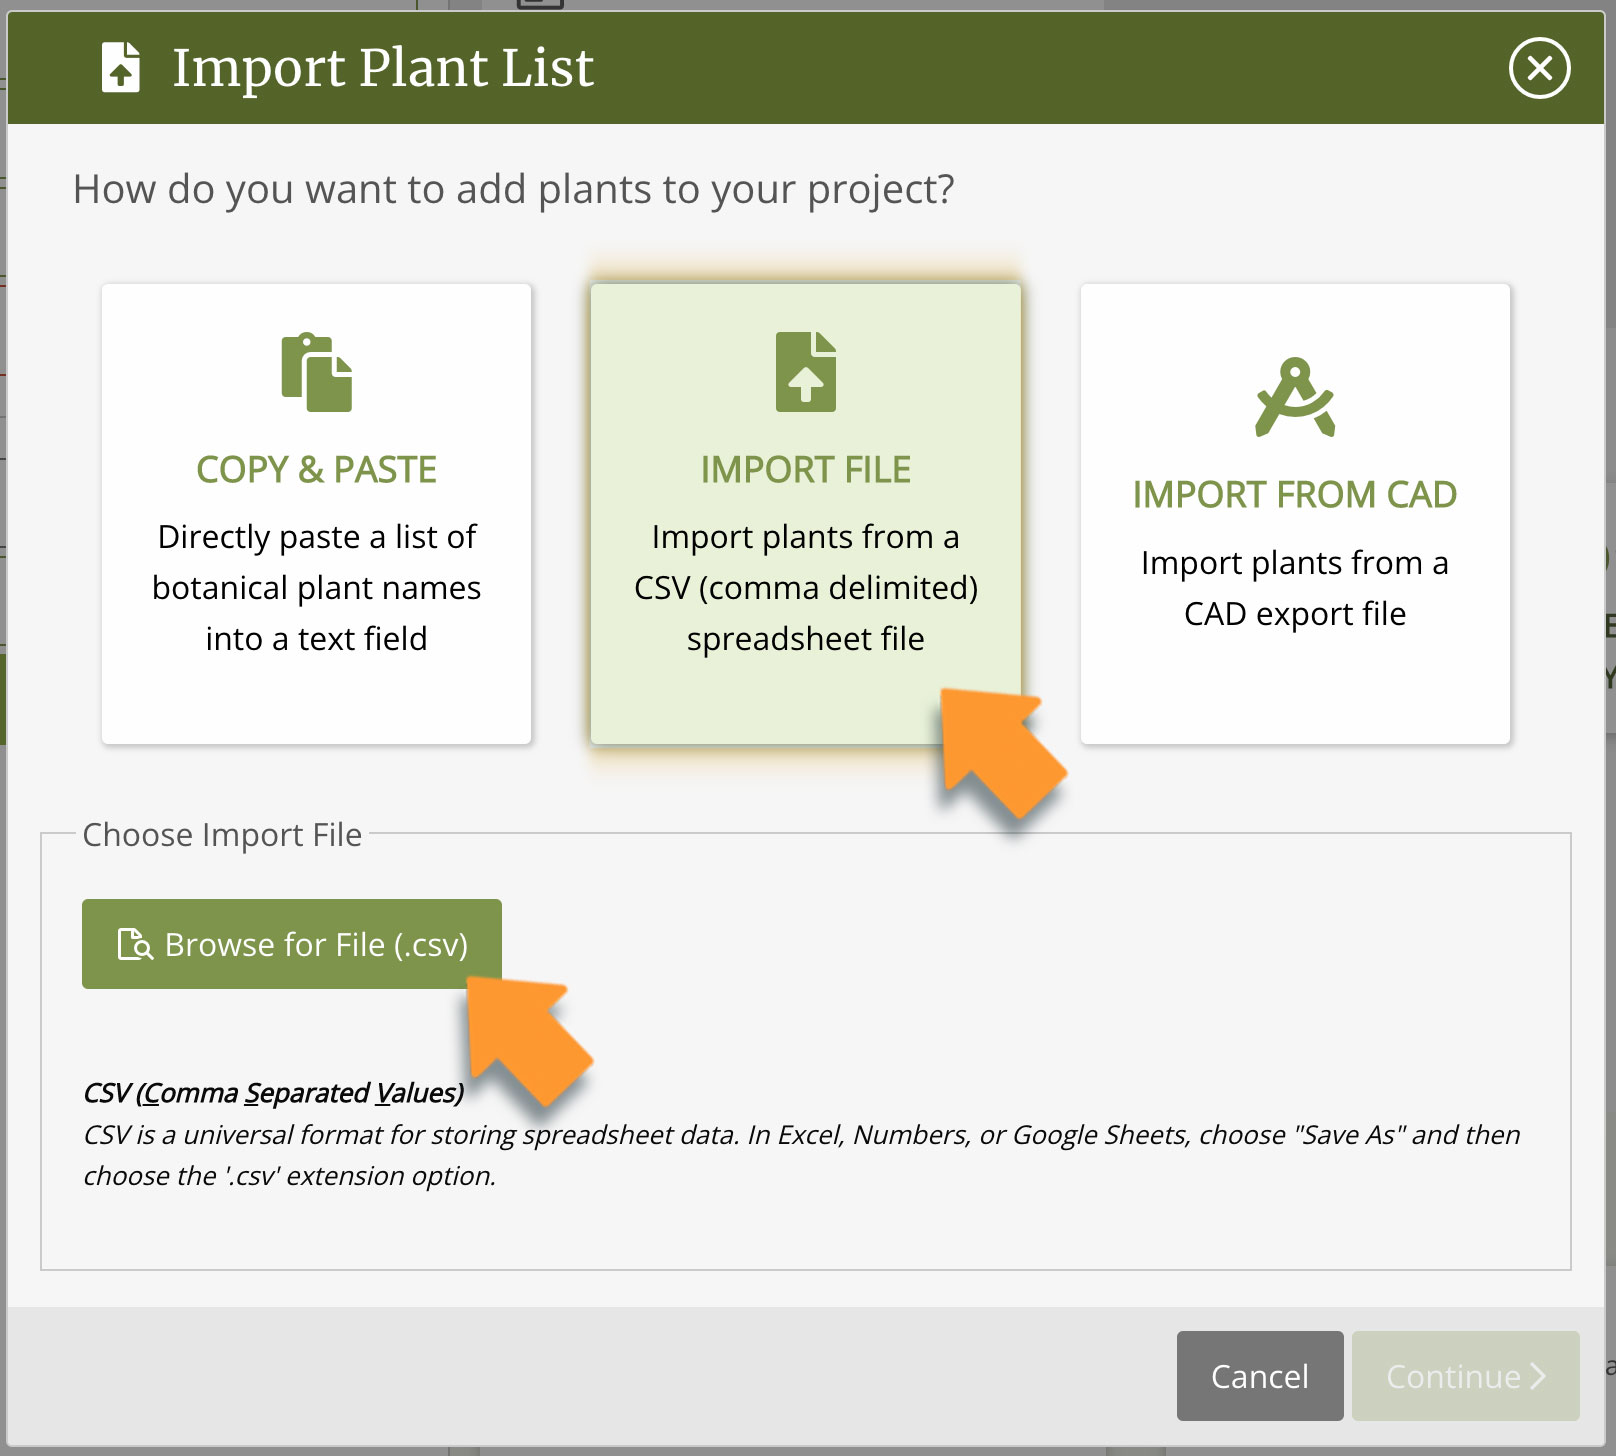
Below this button you will see a button called “Browse for File” where you can upload your file. Click the button and find your new .csv file.
Then click continue.
Now it’s time to make sure we get all your information.

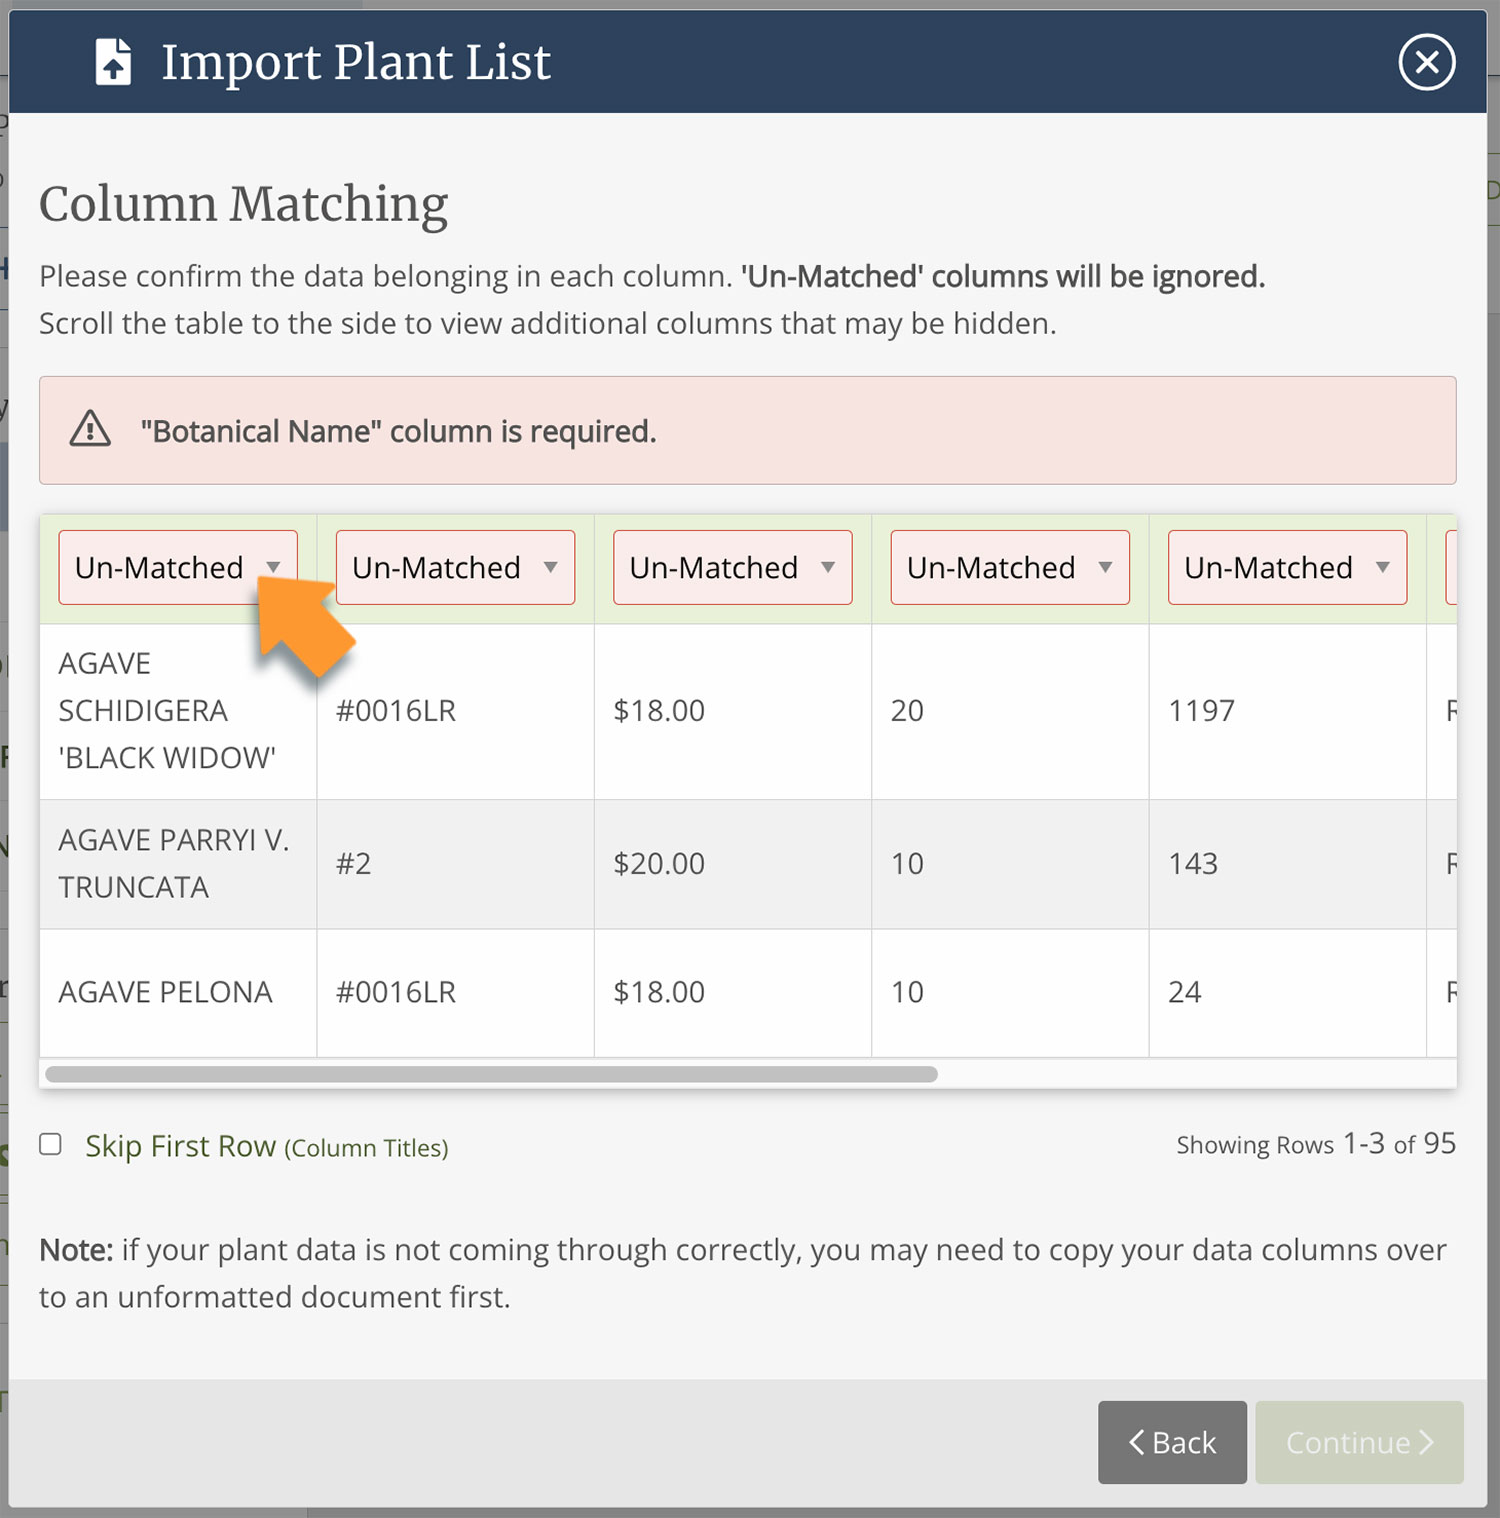
Match the columns of plant information.
Your spreadsheet likely includes a lot of information for each plant. And rather than make you spend time formatting your spreadsheet into a very specific layout, you can use this tool.
Here is what the columns look like. You’ll see the plant names and other information listed below headings that read “Un-Matched” or something else.
(If you don’t see the plant names on the screen, you will need to go back to your original spreadsheet. Save a new copy of the spreadsheet and delete anything at the top (like contact information or other notes). That way all the plants are near the top.
If you can see the plant names etc, you are ready to go!
First, find the column of your botanical names and make sure PlantMaster has correctly assigned that column. You can make a change by clicking on the drop down at the top.

Make sure you’ve correctly found your botanical name before you move on. It will look like this once you assign the column as “Botanical Name”.
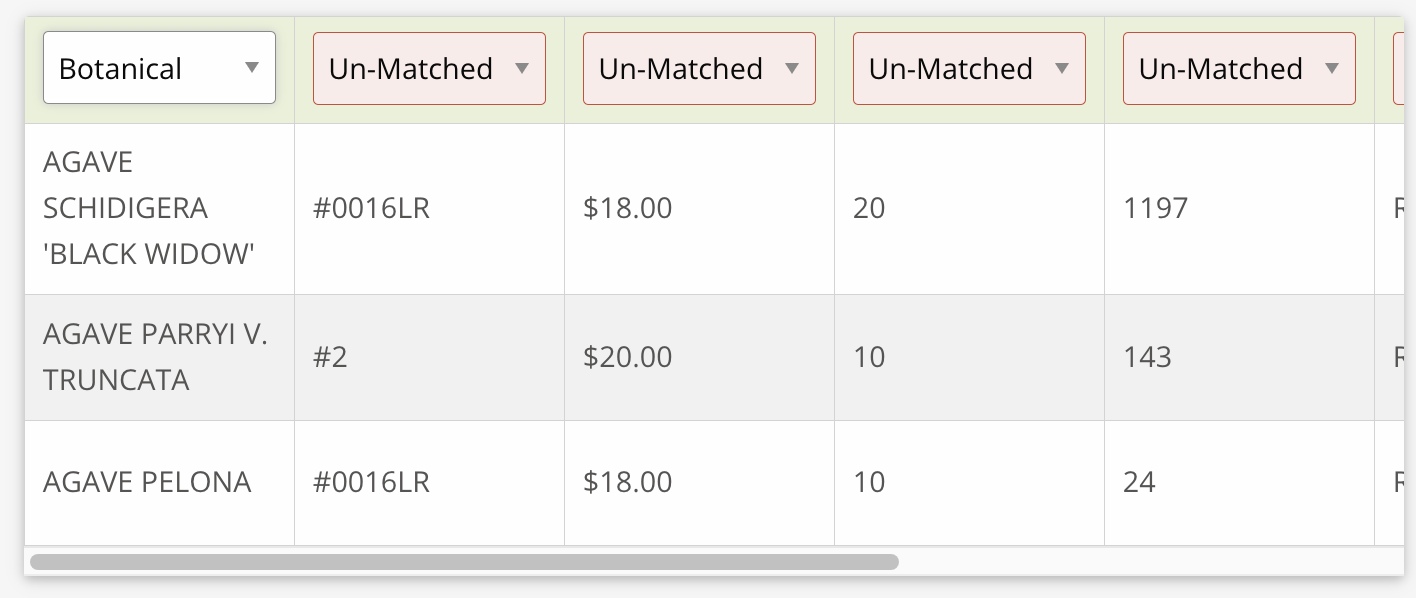
Now do the same for Plant Code, Common Name, Container Size, and Quantity.
(Please note, your plant details like height and width, bloom season, etc. will need to be changed inside the ePlant (plant record) and will not be adjusted as part of this process.) Any other data on your spreadsheet will be skipped.
Once you have all your legend data connected, click “Continue” – Now you’re ready for the last step – start matching the plants to ePlants in PlantMaster.

Import Plant Lists – Make sure all plants are matched to PlantMaster ePlants.
In this step, you need to make sure all your plants are matched up to plant records (ePlants) in PlantMaster. Any plants that are not matched will not be added, so its worth taking some extra time to make sure your plants are matched! This is what this screen looks like:
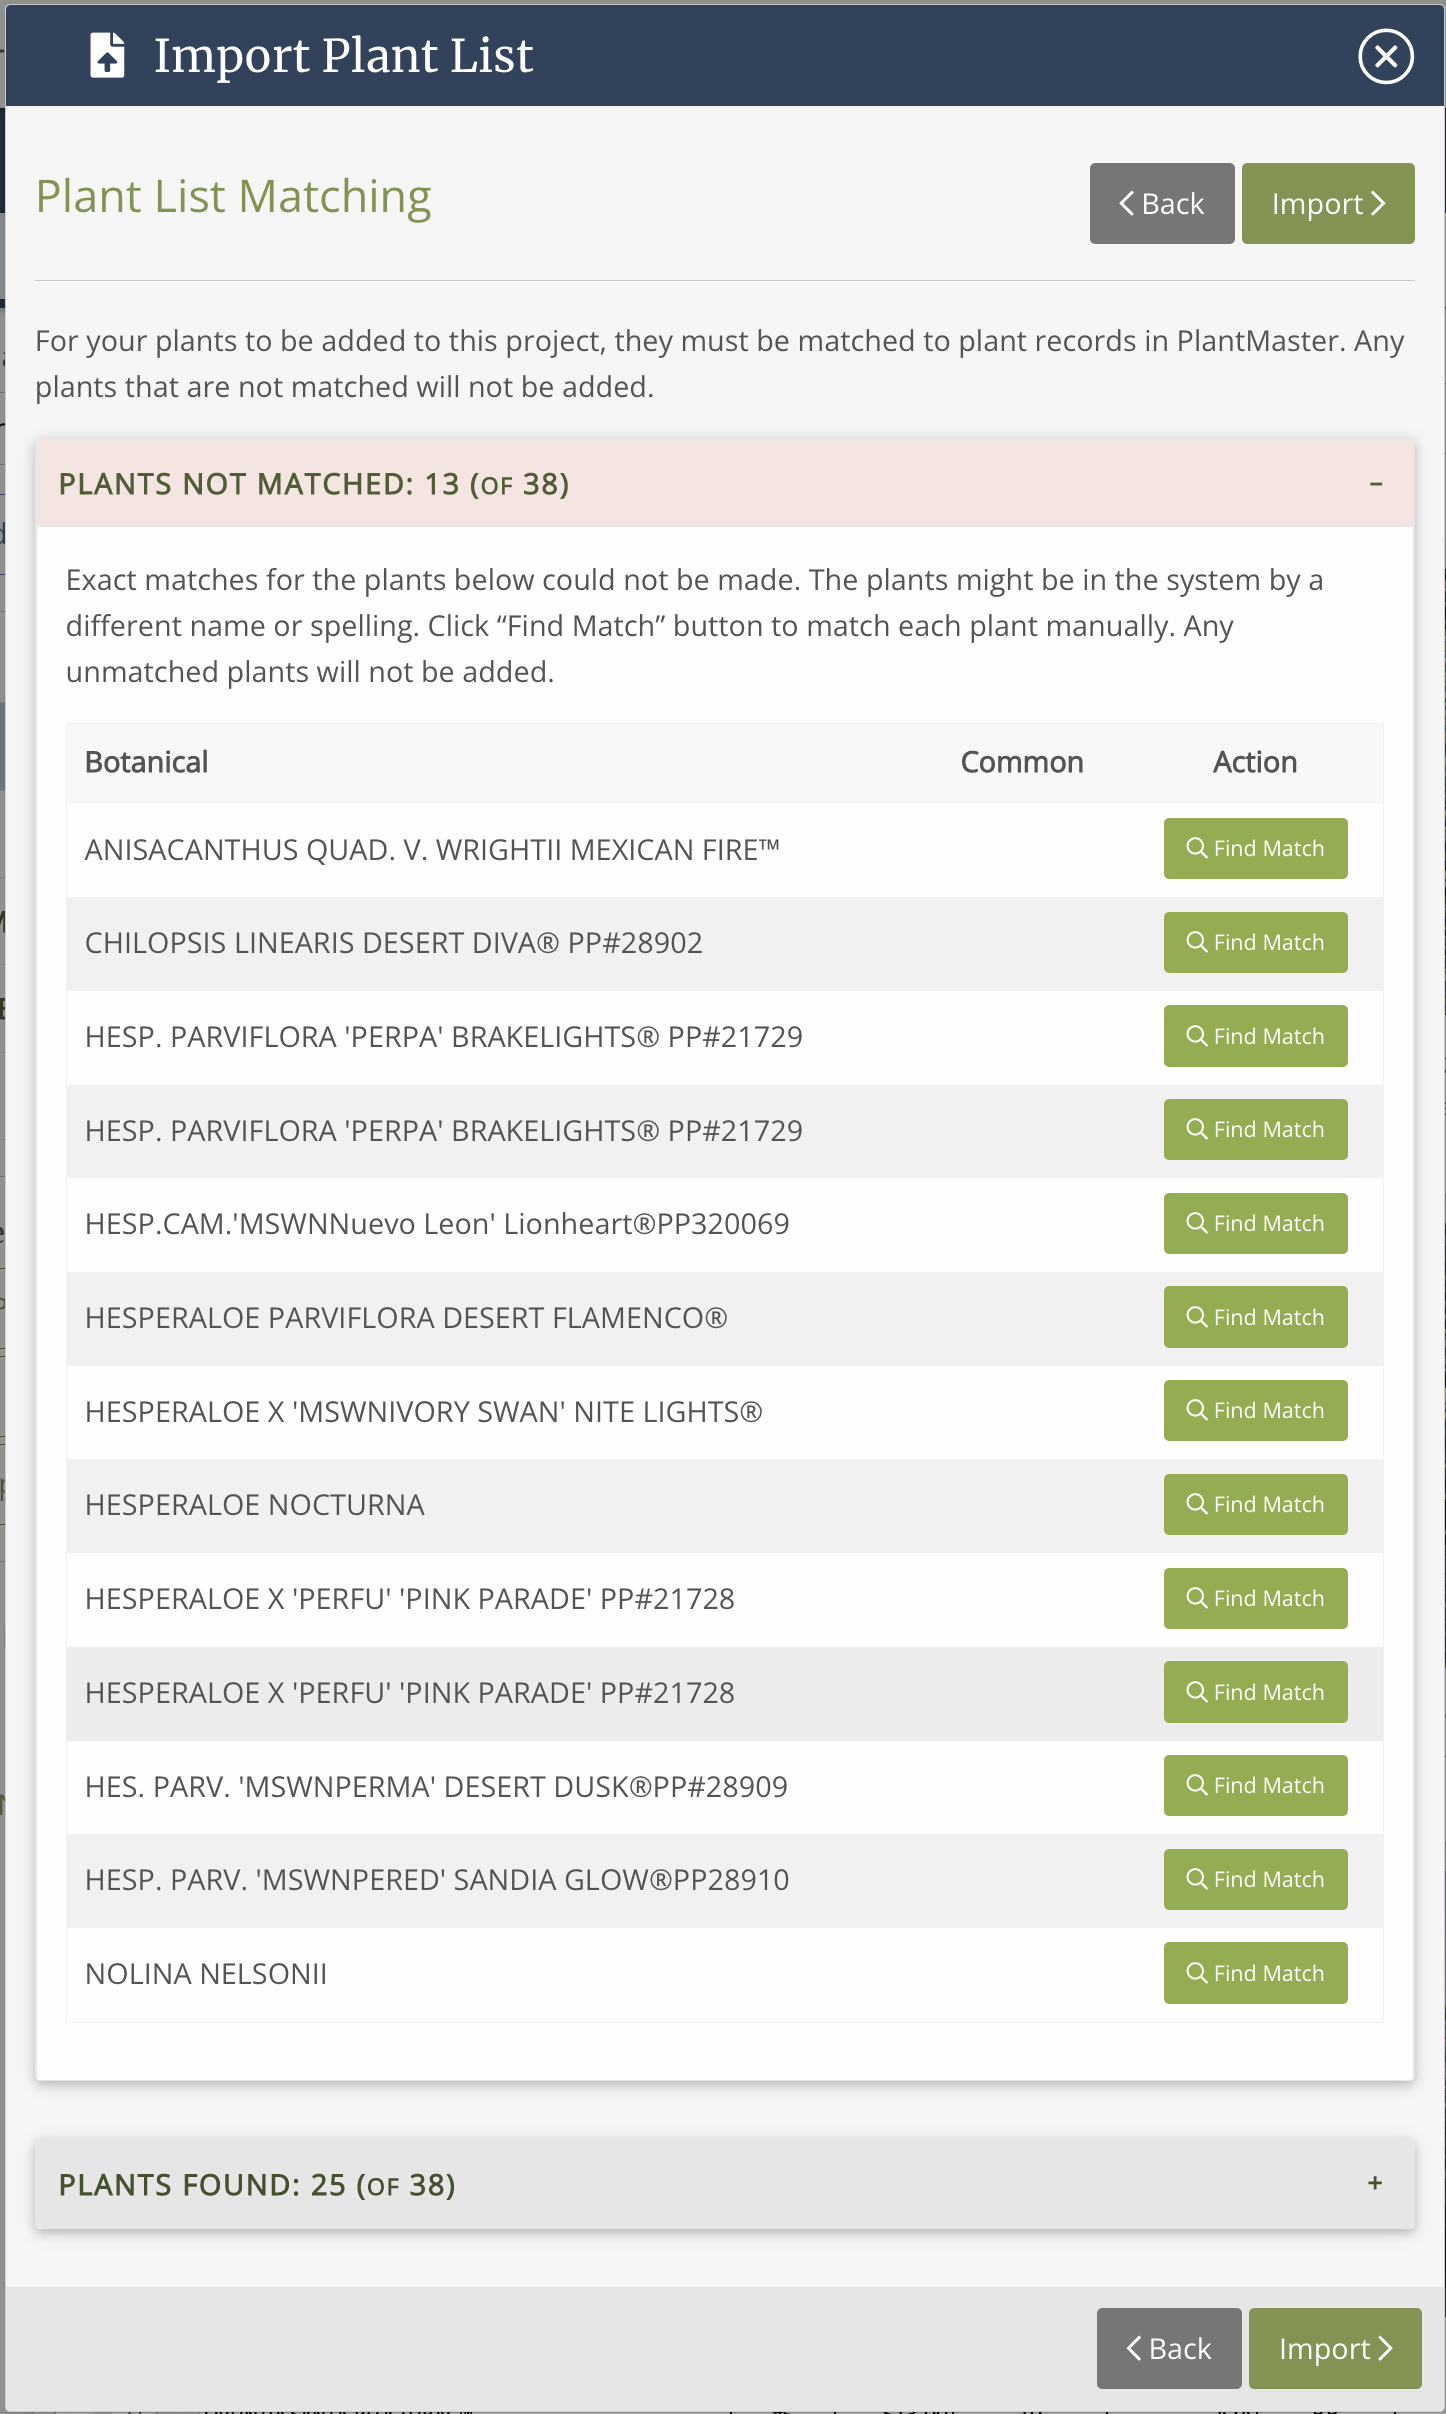
PlantMaster will try to make the matches automatically for you. But, remember that it IS software (and not a person) so it will only match plant names that are spelled EXACTLY the same. And we all know how many different ways there are to spell plant names!
The first section will be in red. This is all the plants that we did not find an exact match for.
The second section is green. This is all the plants that were correctly matched to ePlants.
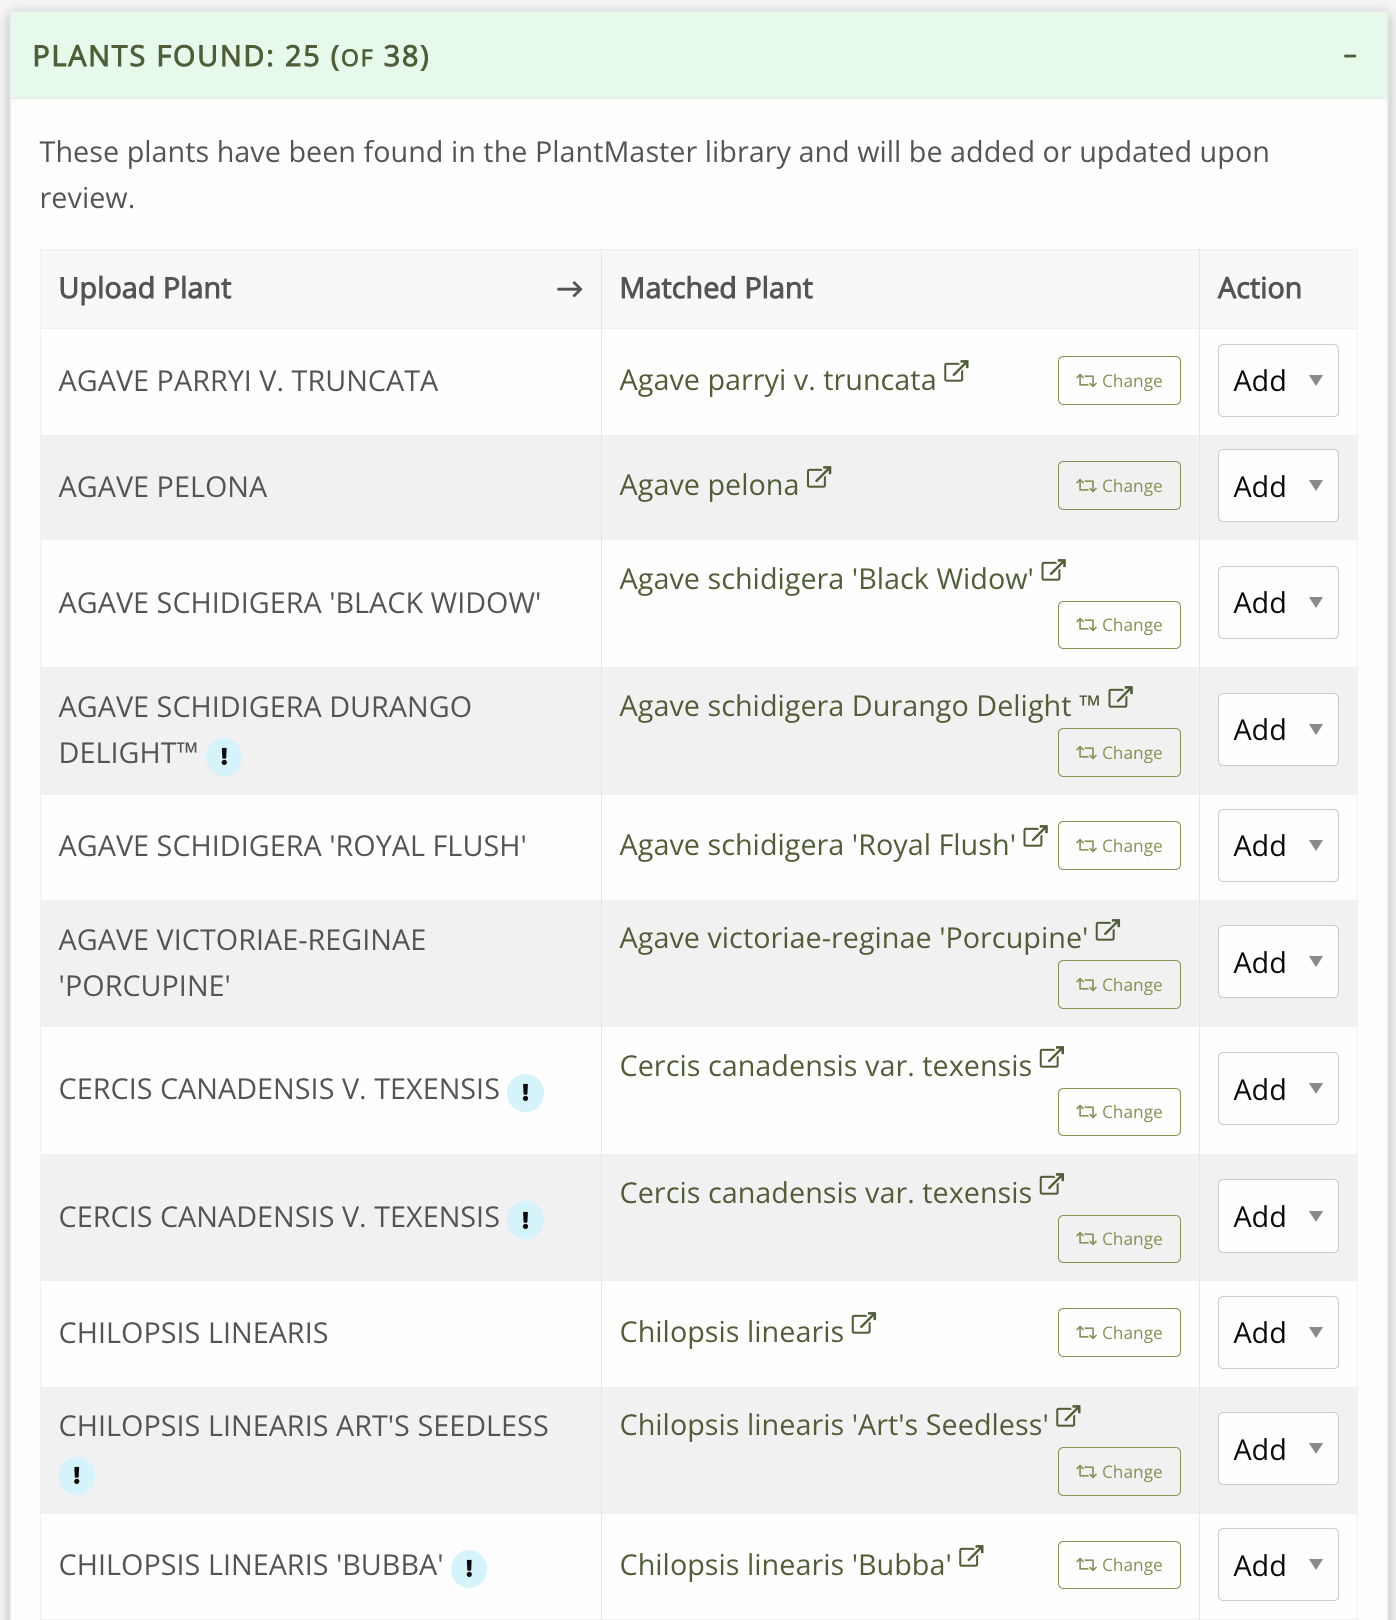
Double check matched plants.
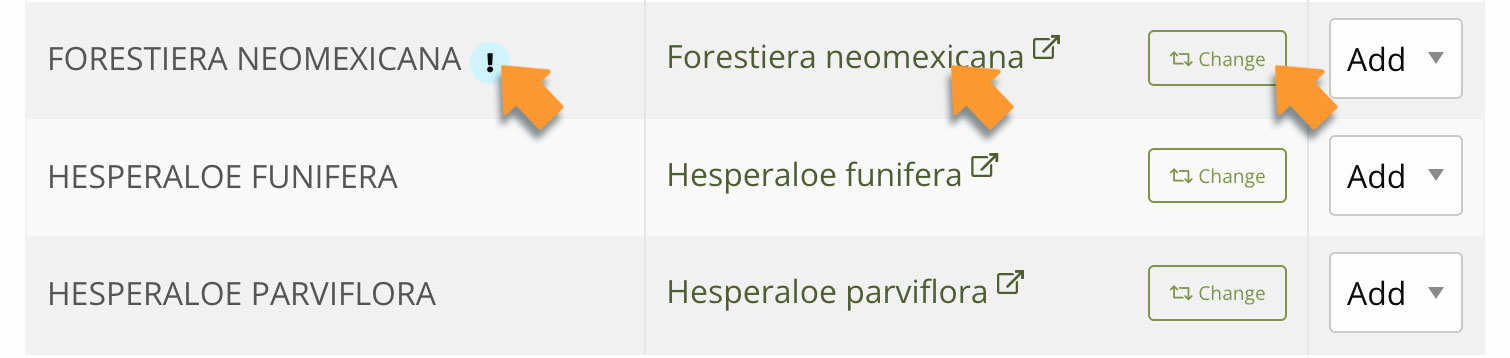
We recommend that you take a quick look at the matched plants just to make sure everything looks right. You can always click the “Change” button if you want to match your plant to a different plant than the one selected.
The blue exclamation mark means the names didn’t match exactly – so please double check that the right plant is selected.
You can click on the plant names to see the full ePlant – that way you can make sure you’ve got the right plant.
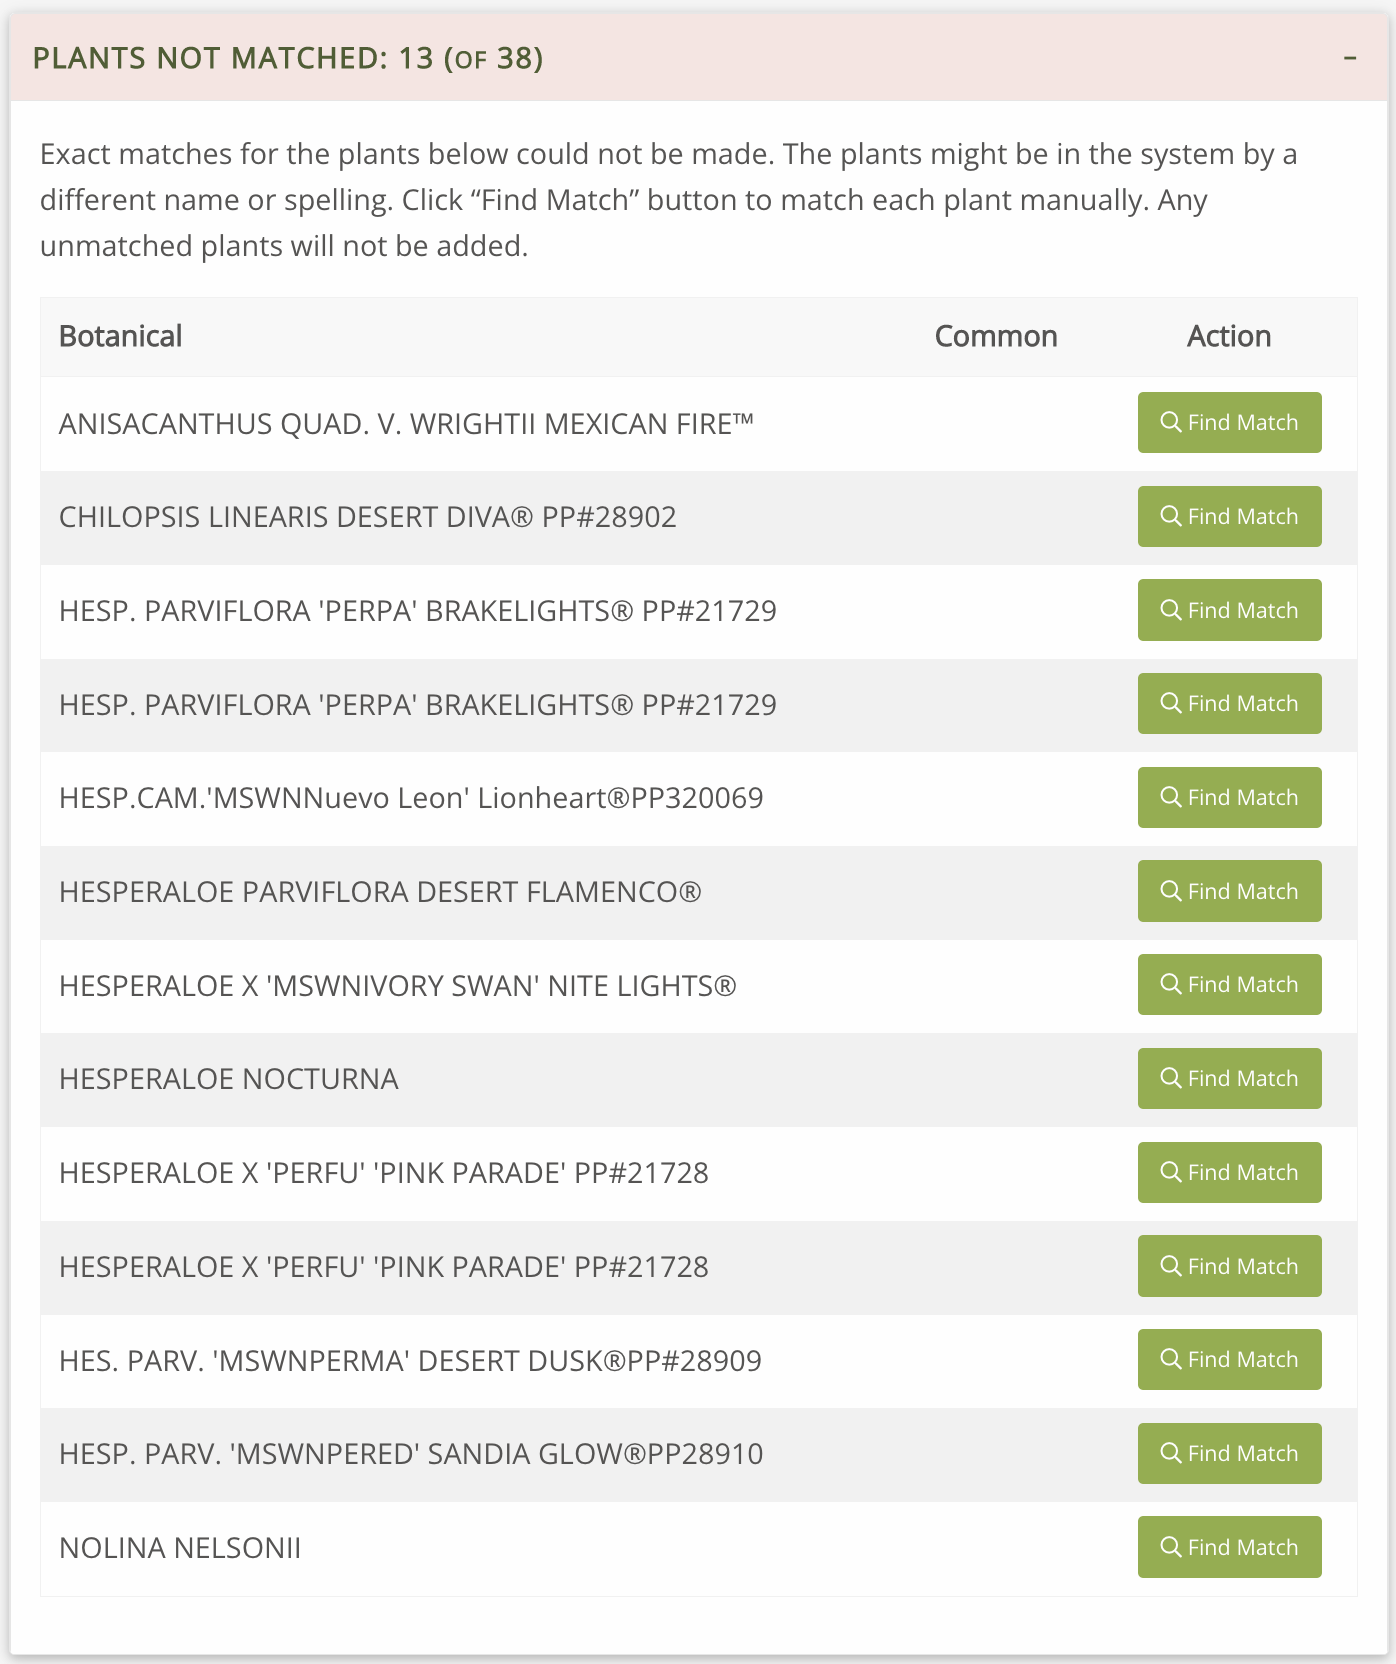
Manually match your un-matched plants.
Next, head back to the red section of UnMatched plants – this is where you’ll need to do a little work to manually match your plants.
The first plant in our example is “Anisacanthus Quad. V. Wrightii Mexican Fire”.
Click the “Find Match” button to the right of the plant name.

This will pull up the plant search. Here is what it will look like:
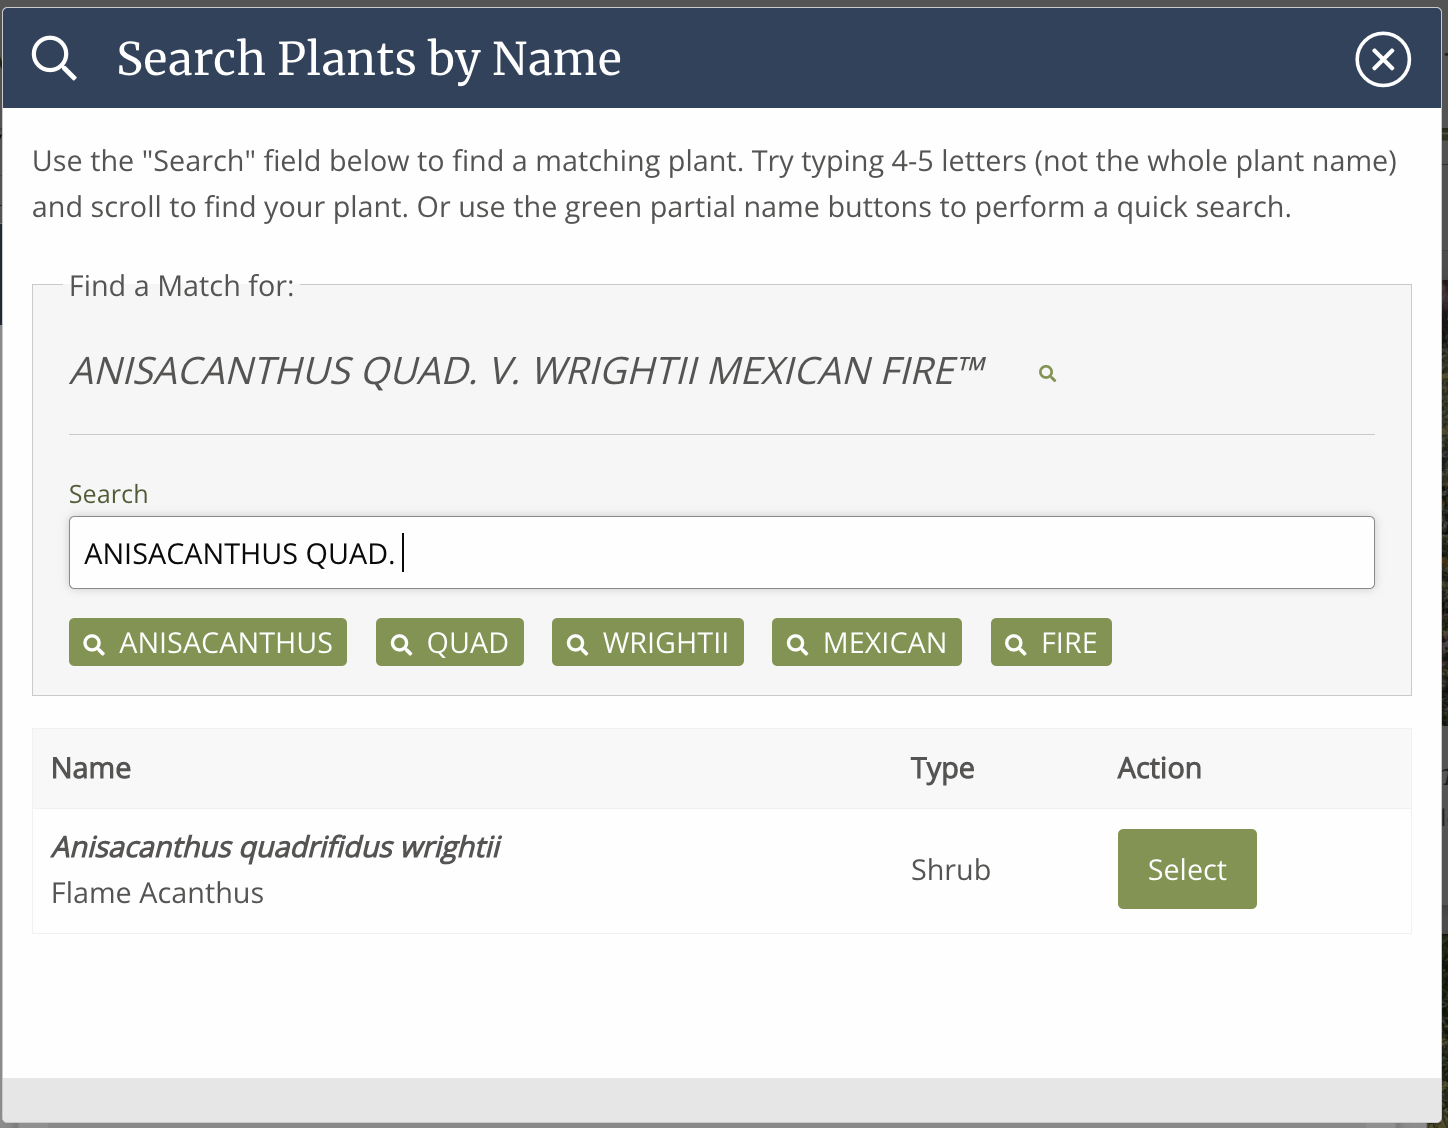
Tips and Tricks to find your plants.
If you don’t see the plant name – don’t give up yet! There are so many different spellings of each plant name and the system just hasn’t found the EXACT match. PlantMaster will search through botanical name, synonymous names, and common names. So give these tips a try!
Don’t type the entire plant name in the search bar. Try typing 4-5 letters and use the list to find your plants.
Or, click on the green buttons below the name. Try clicking on the various parts of the plant name to see if we have your plant.
In the example above, try searching by what is most unique in the name. Try “wrightii” or “quad”
Lastly, if you know the common name, try typing part of the name.
Once you’ve found the plant, click “Select” and it will be connected to the ePlant. You will see the plant disappear from the Un-Matched list.
Repeat this process for every plant in your list.
At the end of this process you will get a file with all the plants that were not matched so you’ll know exactly what plants to add. (We don’t have a way to automatically create a new plant, yet – so you’ll need to create those plant records in another step.)
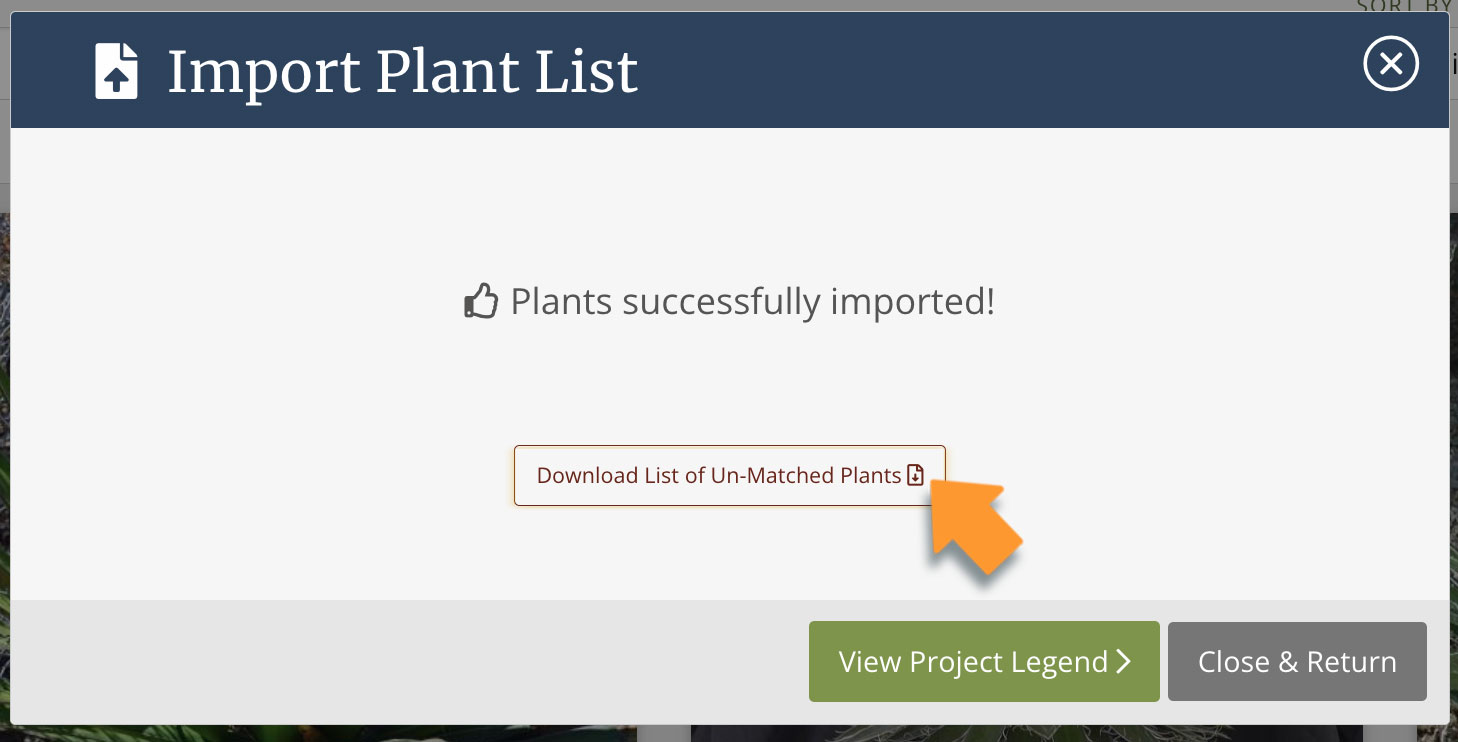
Once everything looks great and your plants have been matched, click “Import”.
This will bring in the plants you have matched. (Hopefully we had most of your plants!)
Here is what you will see:

These plants are all now part of your current project and can be used in any future projects.
You’ve also brought in key information for this specific project like container sizes, quantities, etc so you can jump right to creating a plant legend.
Now when you go to the design section of your project, you will see all the plants you’ve added.
That’s it! You’ve added plants from a list!
If there are plants that were not added, make sure to click the button called “Download List of Un-Matched Plants”. This will give a file of the plants that were not added for your reference.
You can easily add these plants to PlantMaster. Please read the article titled Add an ePlant to follow step by step instructions on how to add any plants that weren’t automatically added.
Send Plant Schedule: Use Land F/X Schedule Integration
Set up the connection. (You only have to do this once)
If you have projects that utilize plants that originated from PlantMaster (or that you know match exactly by latin/botanical name to PlantMaster’s library), then you can utilize Land F/X’s Schedule Integration feature to have your plant schedule data sent to PlantMaster directly. PlantMaster will receive the data transmission from Land F/X and based on the Project ID (set in Land F/X), it will either create a new project or update an existing project (it will only ever match a project that was first created using this method).
Here are the steps to get this set up:
Create a custom ‘Schedule Integration’ URL
To set up the connection between Land F/X and PlantMaster. Open up your PlantMaster account and go to Manage My Projects page. Select a project and click on the button to the far right under “Actions” called “More”. It doesn’t matter which project you choose. You are simply getting a link that will connect the two systems. Then select “Import Plant List” from the options.
This will pull up the Import plant list modal.
Choose “Import From CAD” and then choose “Land F/X”. Find the input field titled “Schedule Integration URL” and click the “Copy URL” button

Create a Schedule Integration preference using copied URL
Back in Land F/X, navigate to your General Preferences screen in your main menu and click the “Schedule Integration” button
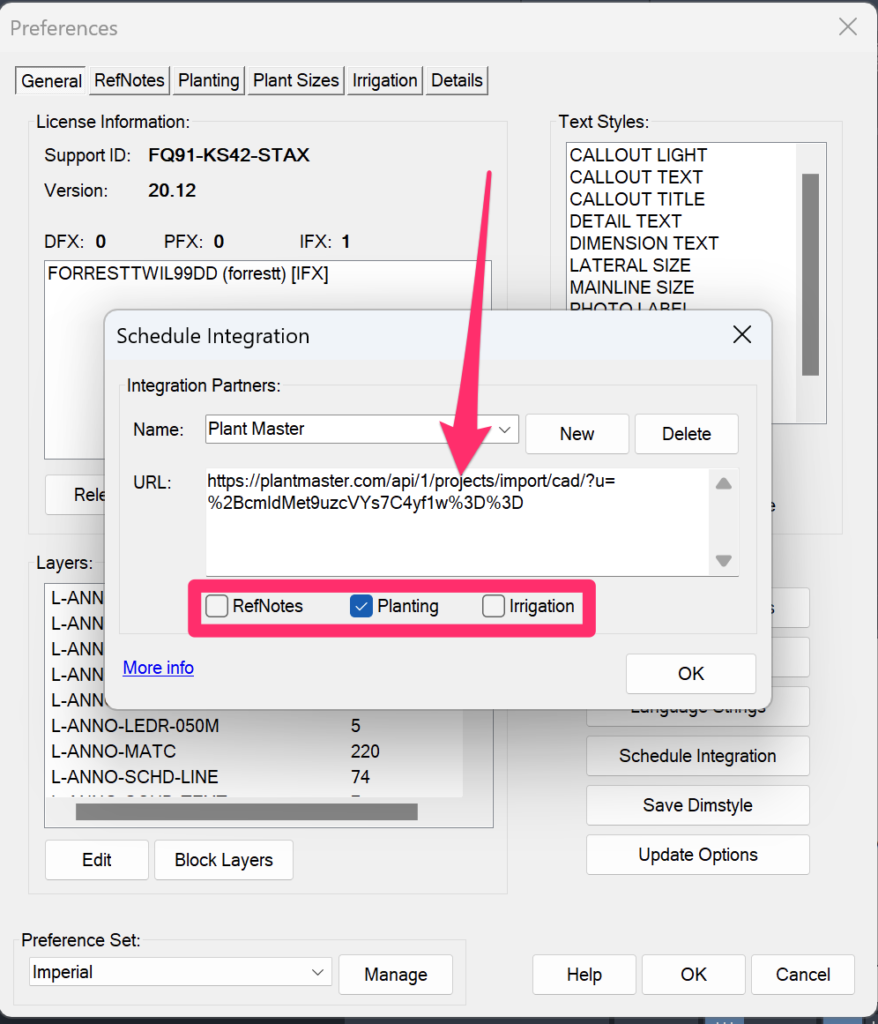
Inside the Schedule Integration dialog box, click “New”
Title the integration as “PlantMaster” or something similar. Then, click “OK”.
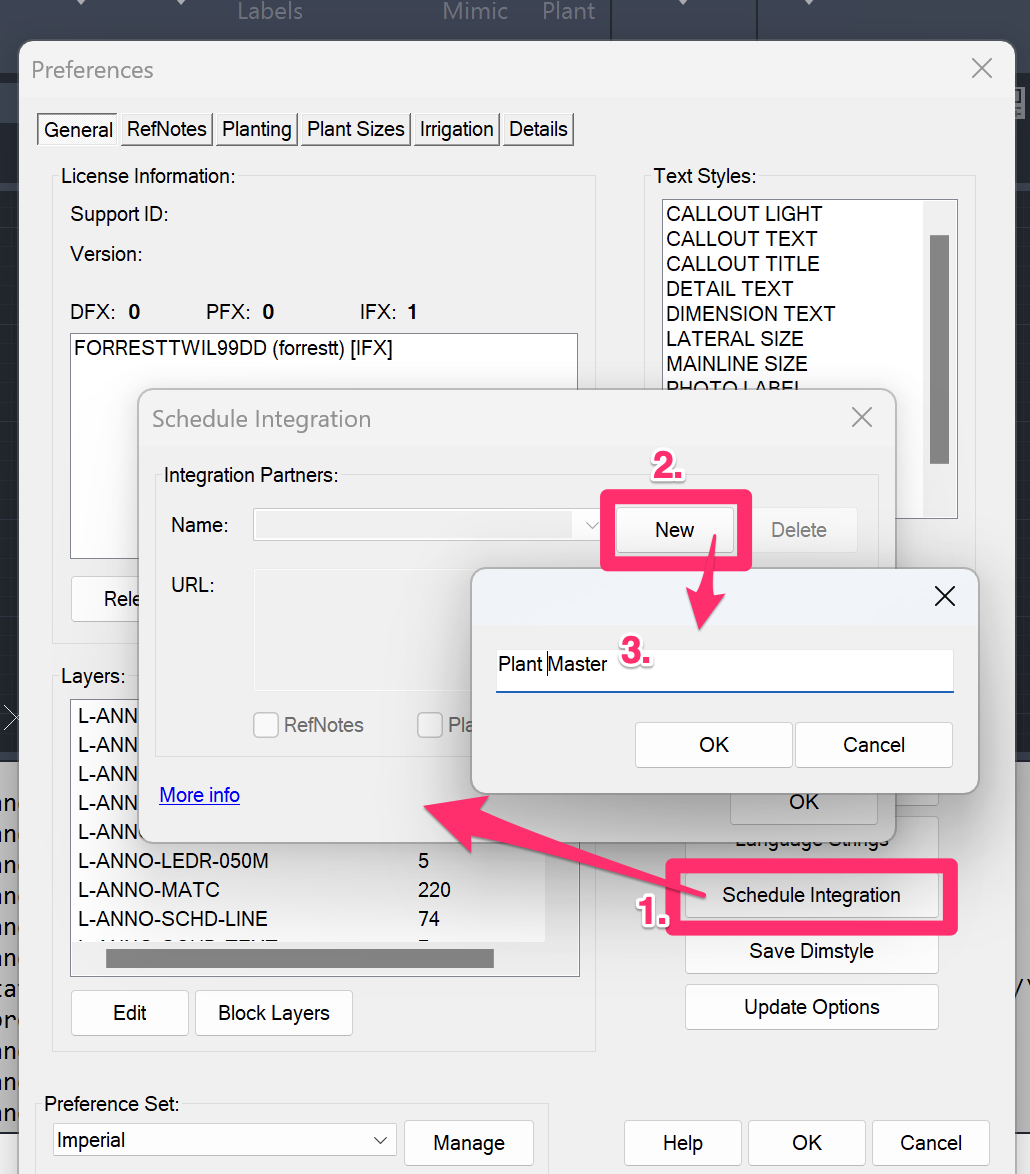
Once the new integration is created, Paste in your custom URL to the URL field and make sure only the “Planting” option is selected. Now your accounts are connected and you can send your planting schedule to PlantMaster. You do not need to repeat these steps every time.
Send your plant schedule to PlantMaster
Now that your integration preference is created, in Land F/X, select a project and navigate to your “Plant Schedule” tool option.
Select “Cloud” as the destination, and then select your new integration preference from the resulting drop-down.
Click “OK” and your plant list will be sent directly to PlantMaster. The first time performing this action for each project will generate a new project in PlantMaster with a corresponding name. However, each subsequent action will update the existing (matching) project.
Congrats! You’ve now added your plant schedule to PlantMaster. Now you can use these plants to create reports, presentations, and legend! And remember, every time you send your plant schedule for this project it will automatically update. You don’t have to do the setup again.